Introduction
This content is called the “IYS” General Merchant Guide, This Learner guide is aimed to provide an overview of the functionality available on the IYS Merchant interface and how merchants would navigate the platform when setting up their own store.
The Guide covers the Back End System that will be utilised by the merchant when setting up their online store and the essential configurations that a merchant must have completed to properly onboard themselves as participants on the IYS Website or App store.
Objectives
The Objective of this user guide is to outline IYS Back End interface through the use of step by step screen representations, explaining in detail how the merchant interface works and the related functionalities available within IYS.
Background Information
What is IYS?
Iveri has partnered with an eCommerce 3rd party that specializes in the creation of applications (i.e. mobile and website) that enable merchants to be able to display their goods and services they are selling in order to receive payments (i.e. online payments). Merchants will be able to do this through the use of an App that was created and renamed for iVeri, called IYS – Increase Your Sales.
Utilizing the designated API, it provides merchants the ability to set up their online stores to be able to receive payments based on what they are actively selling, allowing them to categorise and display what they want to present to their end customers.
Co-partnership with iVeri
The eCommerce 3rd Party has partnered with iVeri to enable their merchants to be able to implement this online store capability, whether it be Web or App based. The Product from an iVeri perspective has been repackaged and renamed as IYS and that it how it is actively sold.
IYS provides merchants the ability to set up their own online store whether it be via the App or the website for their clients to be able to buy goods or services using that availed online store interface.
iVeri will be the processing payment gateway for the merchants that choose to take on IYS as a product with the added advantage of using the IYS Back End interface to begin setting up their online store and tracking transactions performed in their platform.
iVeri has their own branded IYS API that will be used to market and sell to their existing client-base and allow those merchants the ability to choose whether they want to utilize the IYS website or mobile app interface.
A Subscription will be assigned to the merchants that will be utilising these Application platforms. (whether Website or mobile App)
Merchant requisites for the IYS Implementation
A Merchant would require the following as a standard:
- Merchant Account
- Gateway Profile
- IYS Store ID
iVeri will be signing up merchants to the Aggregator they belong to
3DS is required for the implementation of IYS
How does this typically work?
Merchants would be given the “eCommerce 3rd Party Back End Merchant System” access for them to set up and configure their online store application, this is accessed through their created URL.
Merchants would have to download and set up their application, customise their look and feel they want to apply on their merchant website. (i.e. Colour schemes, Logo, payment methods and etc.)
Merchants would add and manage their inventory and what they want to sell on their platform and choose iVeri as their payment processor.
Important Note:
When setting up the store they would need to update their Payment settings page which consists of Username, Password and User group
IYS – Value Proposition
Benefits to the merchant
- Secure, Quick and Convenient way of accepting payments.
- Digital interactive and easy to manage the platform.
Features
- Provides a Back End Admin site for the merchant to set up and configure what they would like to have displayed on their online store.
- Merchants can also set out terms and conditions for shipping & refunds etc. using the IYS Merchant Back End Admin platform.
- Allows the merchant to customize their own look and feel of the store.
Role Players
iVeri needs to:
- Provide 1st line support to the merchant.
- Provide support on the Back End Admin enquiries . Inform eCommerce 3rd Party on merchants to be onboarded.
- Onboard the merchant on the Admin Gateway & Cardinal for IYS.
- Provider merchant with credentials in order for them to add iVeri as their payment processor on their IYS Backend System.
eCommerce 3rd Party needs to:
- Set up and Create the merchant on the IYS Platform (Store ID).
- Provide 2nd line support.
- Address technical queries that the merchant may have.
Merchant needs to:
- Sign in and Set up their Online Store
- Configure and enable iVeri as the Payment processor using the iVeri provided store credentials
- Send iVeri their Store ID in order for iVeri to complete the onboarding
Connecting your IYS store via Social Media
Connecting your IYS store via Social Media
In this process, we will look at configuring a Merchant’s online store via a Social Media Platform.
For this example, we will be setting up an iVeri Demo store via Facebook.
1. From the menu, the Merchant would need to select which social media platform they would like to configure.
Click on the tab ‘Connect to get your Facebook Shop’.
Note: In order to link your account your Social media page requires a Business Manager account as well as a catalogue of products.

2. The next step would be to use your social media login credentials to connect to your selected Social media platform.
Click on ‘Continue’.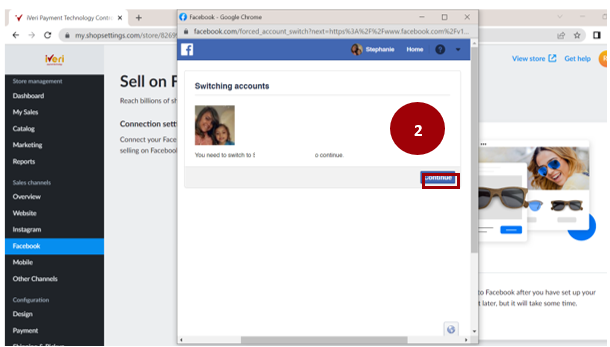
Note: It is important that you have a Business Account / Profile setup on your social media platform.
Click on ‘continue as’ (this would appear as your social media account name).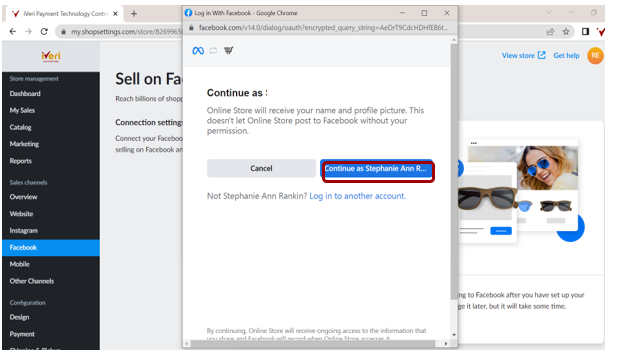
3. Now that you have successfully logged in, the Merchant will provide IYS access to post Ads and link products to your social media shop.
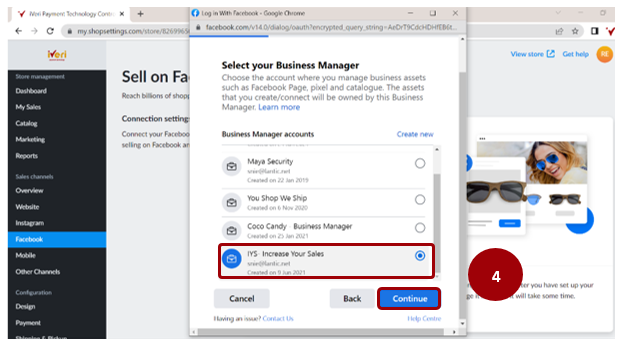
4. The Merchant would need to select the Business Manager Account where they manage their business assets (catalogue, Facebook page etc.)
If you have more than one Business Manager Account, please select the correct account that you would like to link.
Once you have made your selection, Click on ‘Continue’.
5. Here the Merchant will link their Business Facebook Page to their IYS store.
This will allow the Merchant to display products from their shop on their Facebook Page.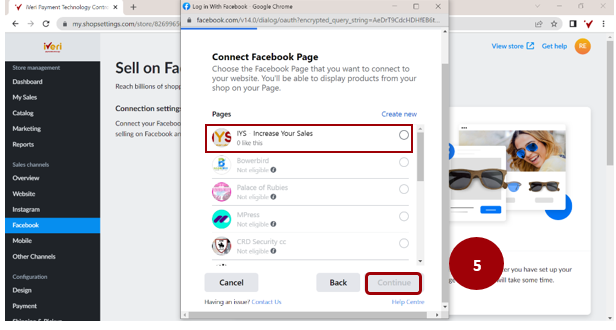
If the Merchant has an Instagram Business account, they would be able to add and link their profile to Instagram in the same setup.
If the user would like to skip connecting their Instagram, select to ‘Skip connecting to Instagram’.
Click on ‘Continue’ to proceed to the next step in the process. 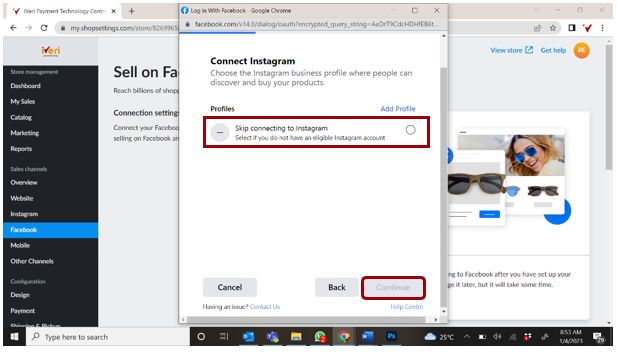
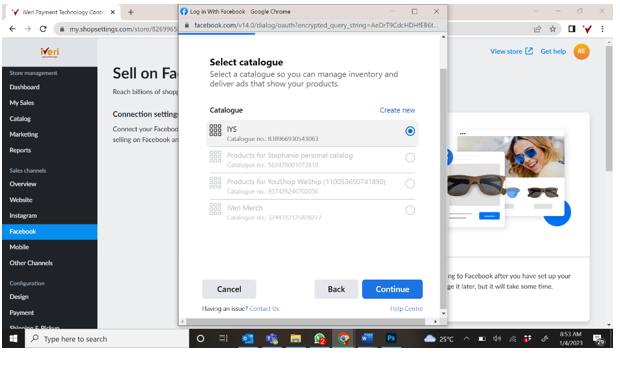
6. In this step, the Merchant will select the catalogue the would like to manage inventory for and Ads that need to be delivered for their select product.
Once the Merchant has selected their Catalogue, click on ‘Continue’.
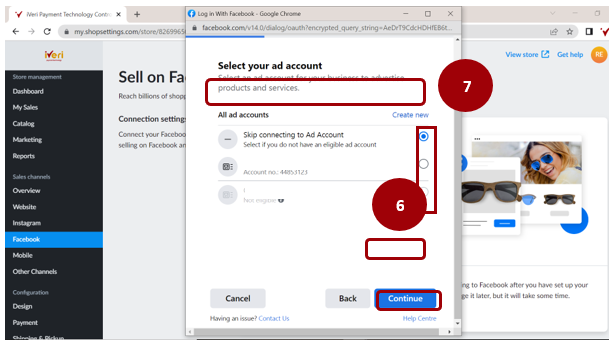
7. Select the ad account for the business you would like to advertise products and services.
Once the Merchant has selected their ad account, click on ‘Continue’.
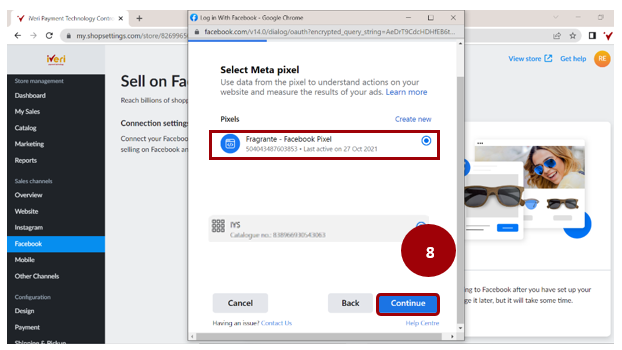
8. The Merchant is able to use data from the pixel to gather information regarding actions on their website from potential customers and measure results from the Ads they have posted.
Once the Merchant has selected the Meta Pixel, click on ‘Continue’.
9. Enter the commerce account name that will feature your products across your social media platforms.
Once the Merchant has selected their Catalogue, click on ‘Continue’.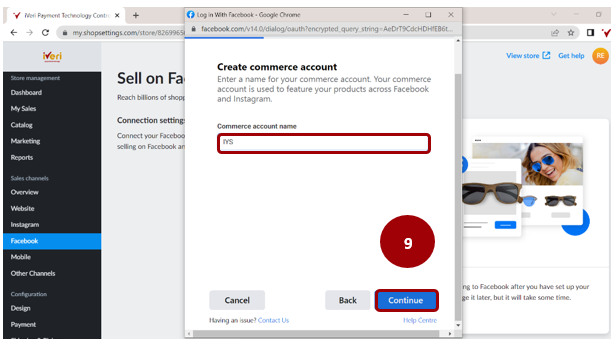
10.this step the Merchant will confirm the commerce account they would like to connect to their selected page.
Once the selection has been made, click on continue.

11. Here the user is able to check and confirm the settings for their e-Commerce account is account is captured correctly.
Once the user has completed their checks, they may proceed by clicking on ‘Continue’.
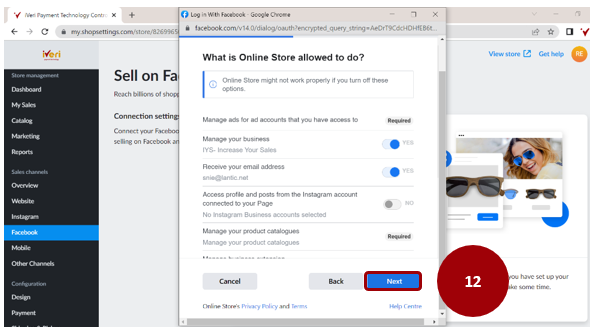
12. Here the Merchant will be able to manage the permissions related to their online social media store / account.
Click on ‘Next’ once you have completed the permissions.
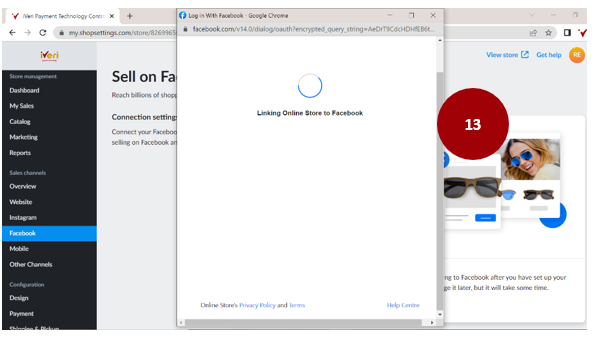
13. Wait a moment while your store is being linked to your preferred social media platform that you have selected.
14. You will receive the following notification pop-up that your store has been successfully linked.
You can now create an Ad for your social media store by clicking ‘Create Ad’, alternatively click ‘Done’.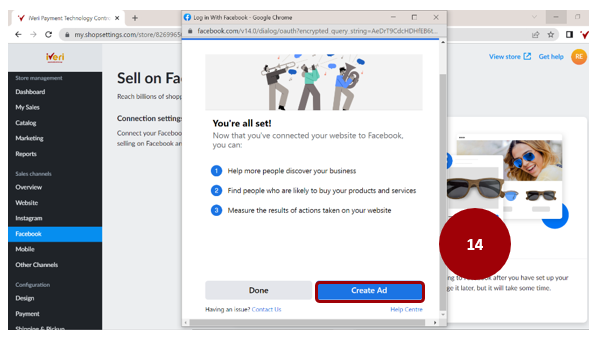
15. This is the notification you will received that your Facebook shop is ready and has been successfully linked.
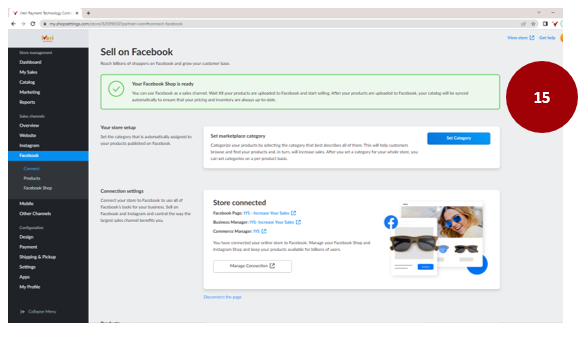
16. A merchant can also verify if their store has been successfully linked to their social media account by accessing the URL for their store.
Navigation Path: Settings > General > Scroll down to ‘Social Media Accounts’
The social media accounts URL will be displayed in e-mail notifications sent from your store.
IYS Sign up process
Sign Up Process
Need the sign up detail process. Where can a merchant access the IYS URL to sign up for a subscription.
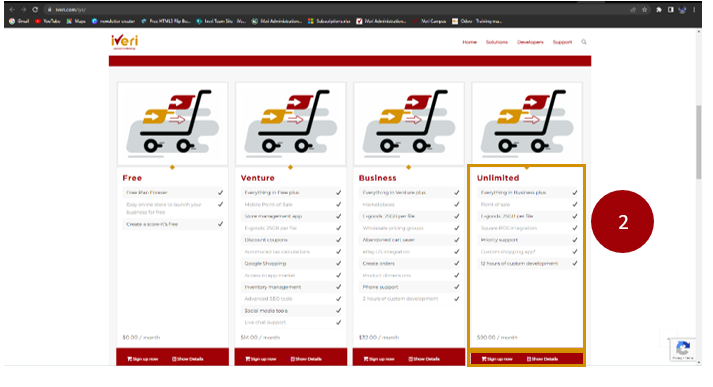
In order to view and compare the IYS packages, user would need to scroll down to ‘Subscription solutions’.
The merchant is able to compare and select a solution that is fit for purpose.
For this example, we have selected the Unlimited option by clicking the ‘sign up now’ tab.
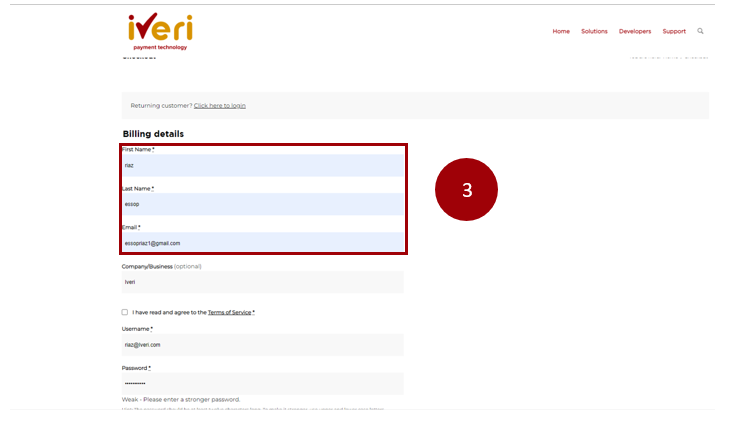
The billing details screen will appear.
The blue fields are mandatory fields that would need to be completed by the merchant.
The merchant would need to insert their personal details and setup their credentials to login to their IYS store.
Note: When setting up a password, enter a strong password that is at least twelve characters long and contains a combination of upper case, lower case, numerical values and special characters.
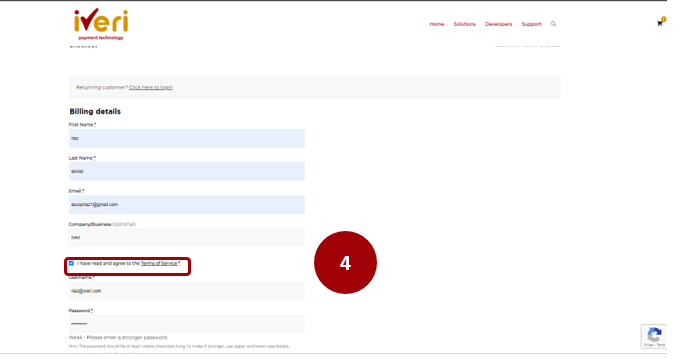
Once the merchant has completed all their mandatory details and have setup their login credentials for their store login, it is important that the merchant ticks the ‘terms of service’ in order to continue with the sign up.
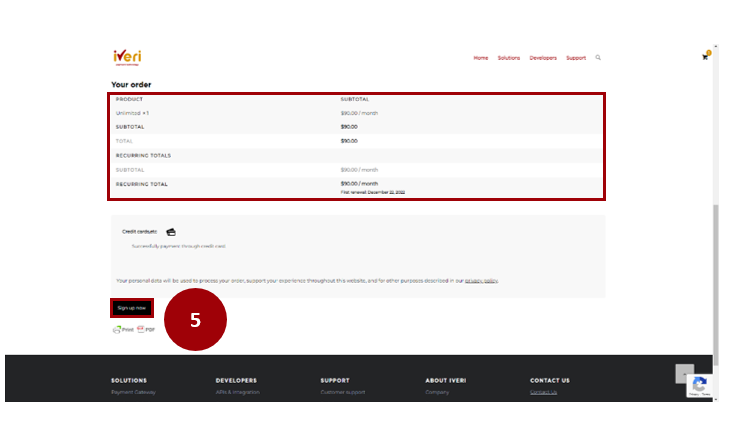
Your Order details
Now that the billing details have been completed, scroll down to view Your Order details.
Your Order details will display the subscription solution you have selected and monthly subscription cost.
Click on the ‘Sign up’ now tab to process your payment.
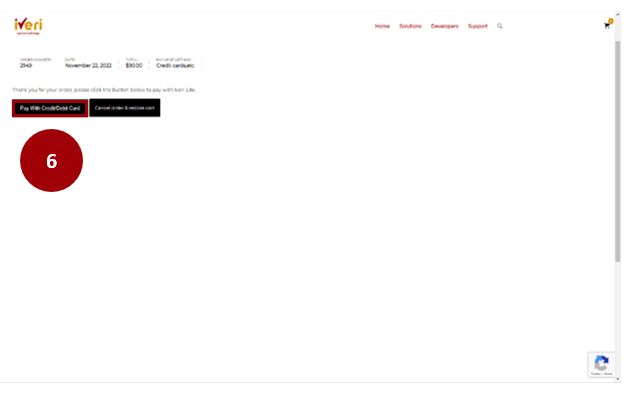
This screen will appear.
You will be able to view a summary of your order and proceed to select a card payment method for your monthly subscription.
To process payment, please select the ‘Pay with credit/debit card’ details tab.
Card Payment details
You will now be directed to the card payments screen.
The merchant would need to complete the card payment details (Credit or Debit card) the monthly subscription will be billed to.
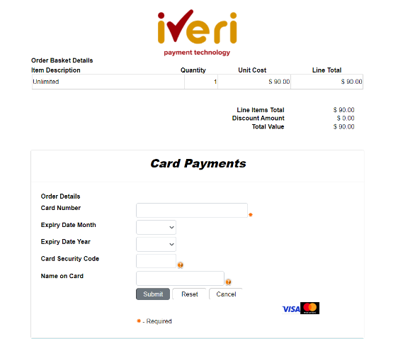
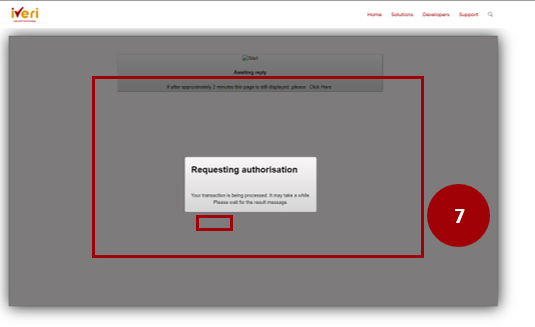
It may take a while for your transaction to process and for the result message to populate.
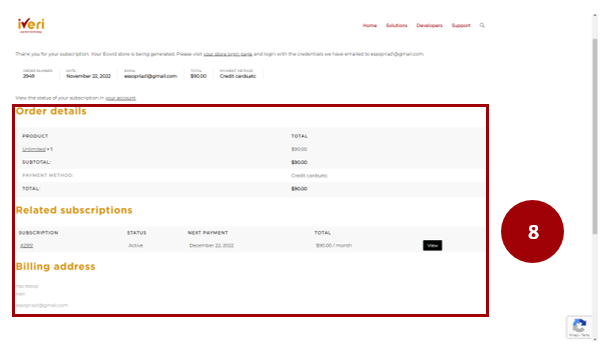
Confirmation of Order
Once payment has been made, the merchant will be redirected to the order summary details page.
The merchant will be able to view their subscription order, any related subscriptions they may have and the billing address they provided.
E-mail notification of registration to go here.
How to Log In
Using the iVeri IYS URL assigned to the merchant.
Paste it on the Web Browser to log in to the IYS platform.
1. Insert your Username (Email) and Password created to access the platform.

Please Note!
The iVeri Demo Store link was used to demonstrate this log in page.
This Platform is the Back End Store environment which the merchant would be able to make changes to their existing online store.
The iVeri Logo is appearing on the app and this is due to iVeri being the reseller for ECWID (i.e., IYS), to the merchants who want us to be their payment service provider.
Once you have inserted your log in details, this will be the merchants landing page.
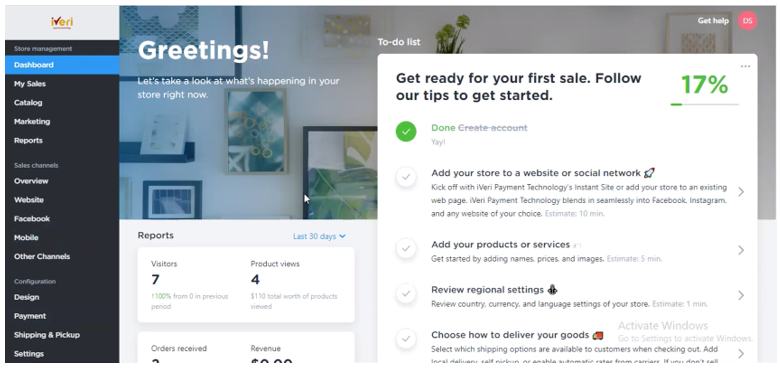
This is the Back End of the merchant’s store, where the merchant can configure their store as per below:
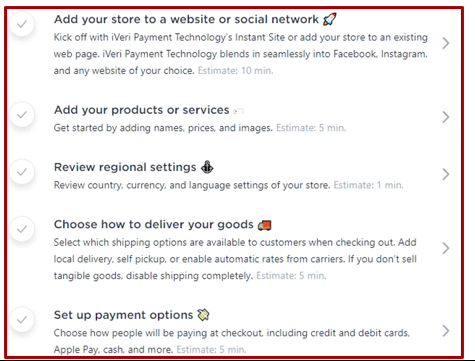
2. This tab speaks to how the merchant would be receiving payments at check out. 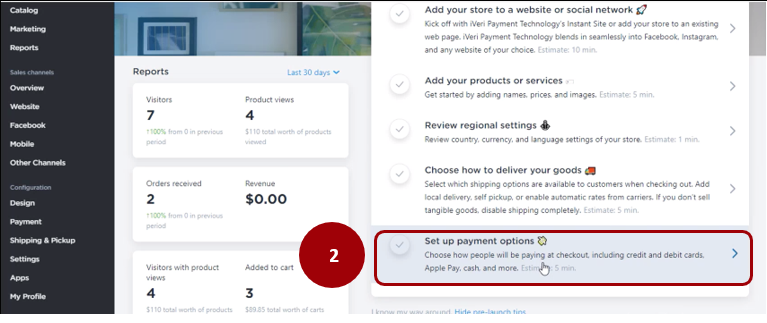
Please Note!
The merchant would need to set up all the above steps as part of their set up of the store.
Configuring iVeri as a Payment Method
Payment Method Configuration – Back End Interface
1.User to use the left adjusted Menu Items, navigate to Payments – To set up your payment provider.
Select iVeri as a Payment Processor.
This is done so that iVeri becomes the payment provider.
The radio button will be on the disabled state until the merchant sign’s in.
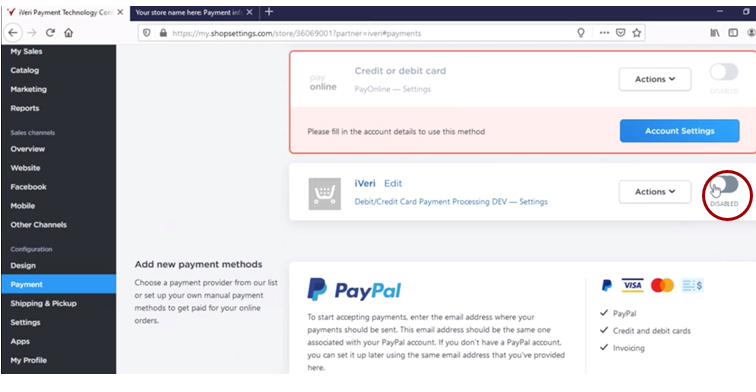
Scroll up and enable iVeri as the payment process here as well.
Select the Enable radio button to allow iVeri as the payment provider
1. Turn the Radio button on.
Select Actions then Edit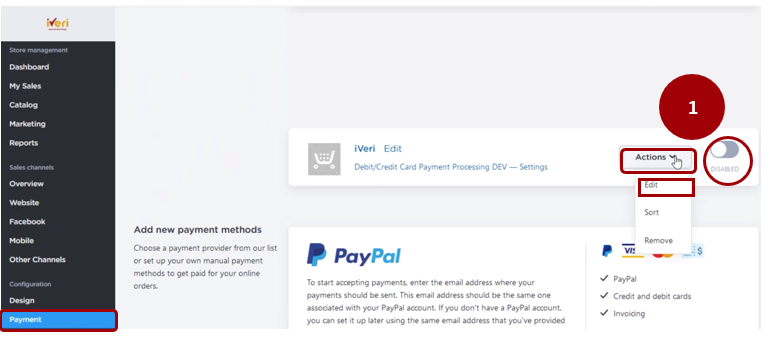
2. The system will update the page.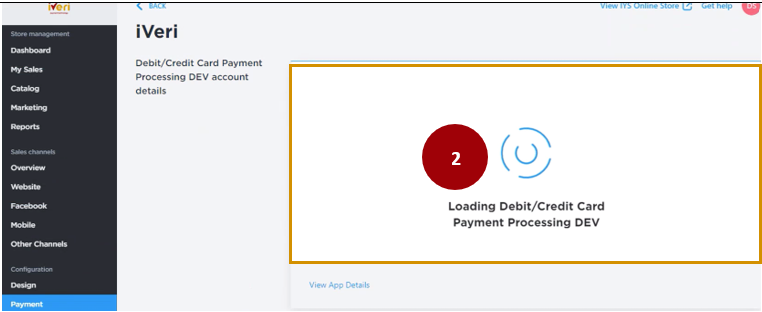
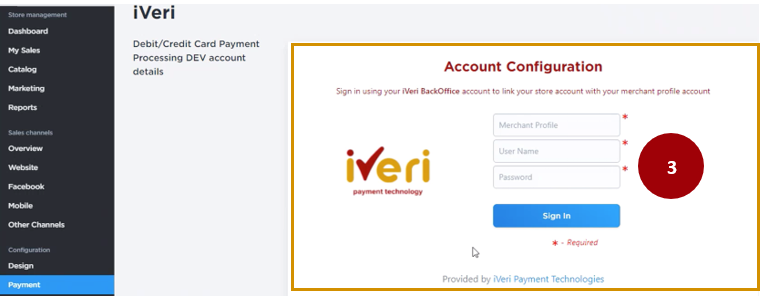
3.Insert your iVeri Provided store credentials.
These are the merchants BackOffice account details that you would have already received.
4.This screen indicates a successful log in and link of the merchants’ store Profile with their iVeri merchant Profile.
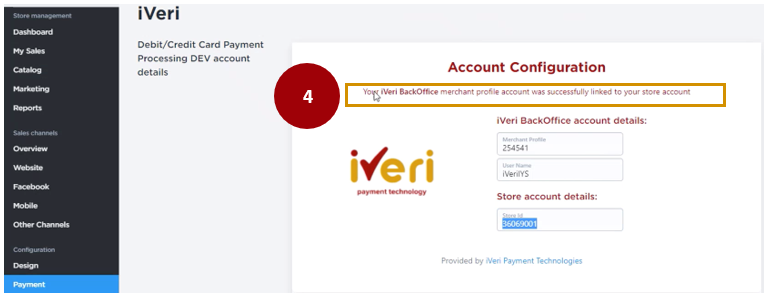
Scroll down and update the “Payment method name at Checkout”
Select Enabled
“Set payment instructions at checkout”
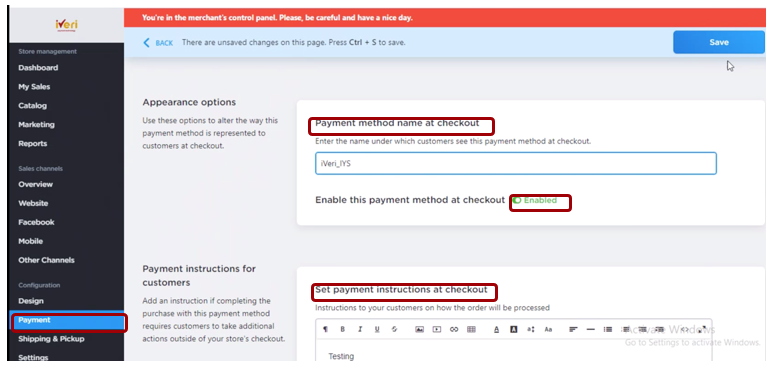
Please Note!
This is what the cardholder will see at Check Out, so this is very important for the merchant to set up on their Back end as indicated above.
Note: This should read as iVeri Payment - Debit and Credit
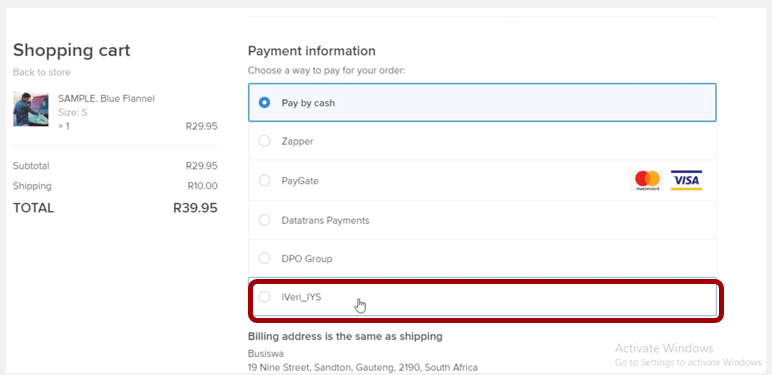
Example of how it will look at Checkout for the client making a payment:
5.Once the Linking of the merchant iVeri Profile is completed successfully, the Payment provider will then be enabled as indicated.

Please Note!
Before the merchant is signed up for ECWID (IYS) they would have initially agreed to have iVeri as the payment provider and also wanted to use the App for the online Store and iVeri would have gone into an agreement with the merchant
The merchant needs to download the iVeri App and set up their profile and as soon as they have onboarded, they can then utilise their online store with iVeri being their payment service provider.
Shipping & Pickup
How to Configure Shipping & Pick Up
1.Use the left adjusted Menu Items, navigate to Shipping & Pickup – To set up your Shipping methods.
Choose your providers you will use to courier or ship the goods based on the aggreement you have with your partner.
How to make a Payment on the Online Store – Online Store Interface
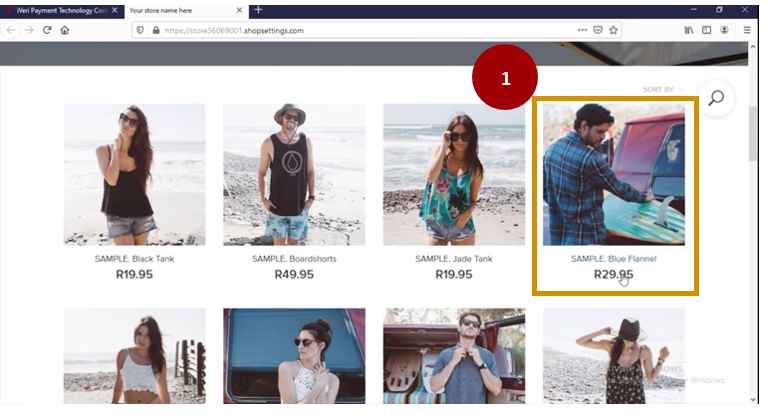
1.Make a selection on what you want to purchase.
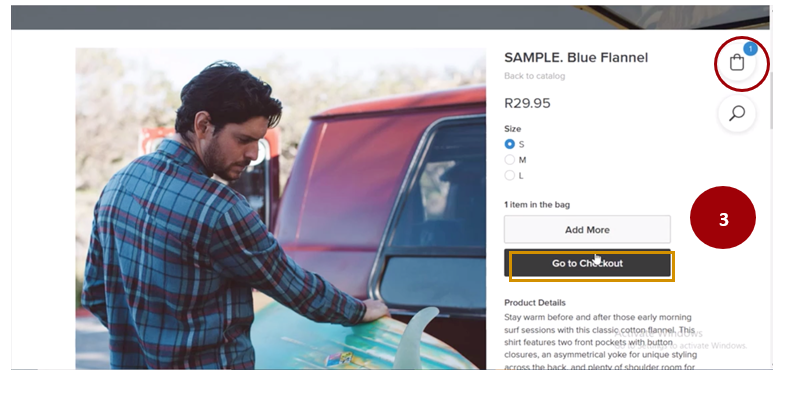
2. Select Add to Bag

3. Select Go to checkout
Here you can either select Checkout or select the Bag icon it is still the same.
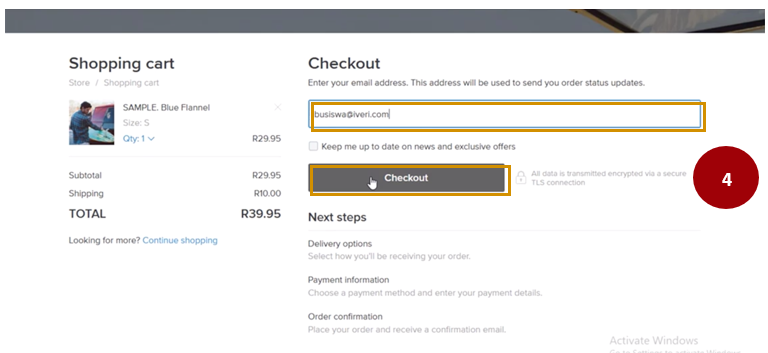
4.Insert your email address and the select Checkout
This cardholder email is used to send the correspondent updates regarding the transaction and order status updates
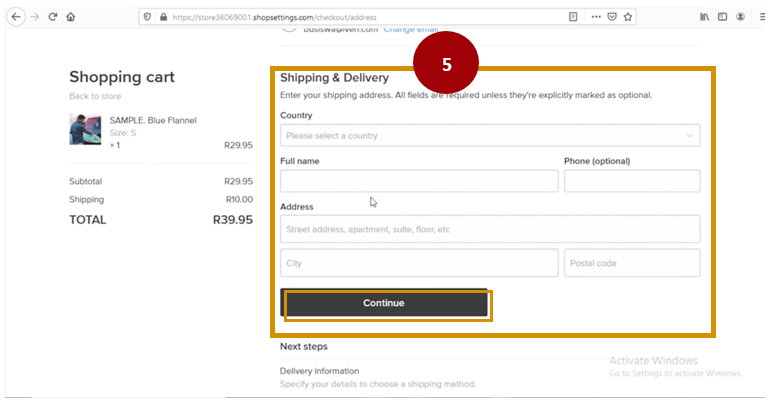
5.Complete the Shipping & Delivery details for the delivery of the goods.
Select Continue
6.Complete the delivery date details
Select Continue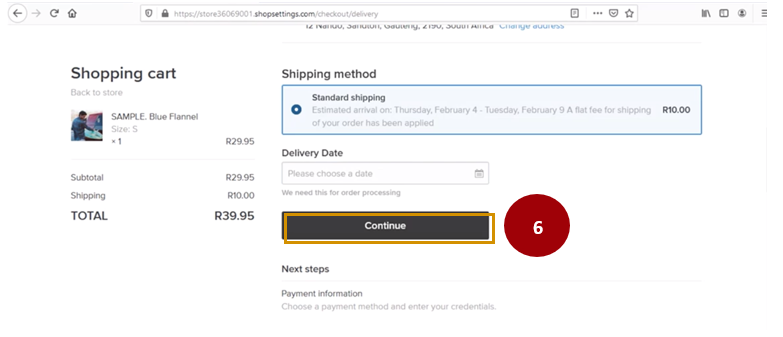
Please Note!
The Store owner needs to set the charges and shipping method under “Shipping and Pick Up” on their Back End IYS Profile.
7.Choose how you choose to pay for this order.
Which in this case it is iVeri 
Scroll down
8. Select Go to Payment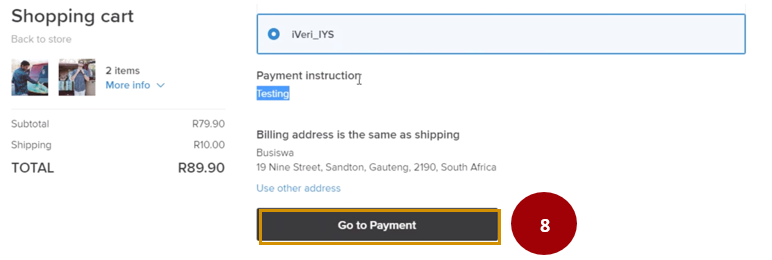
Please Note!
Payment Instruction is set up by the merchant as a special instruction at Checkout, this is done on the Backend
The screen will take you to the Payment page where the cardholder details are to be inputted.
Cardholder is to capture the card details to complete the transaction.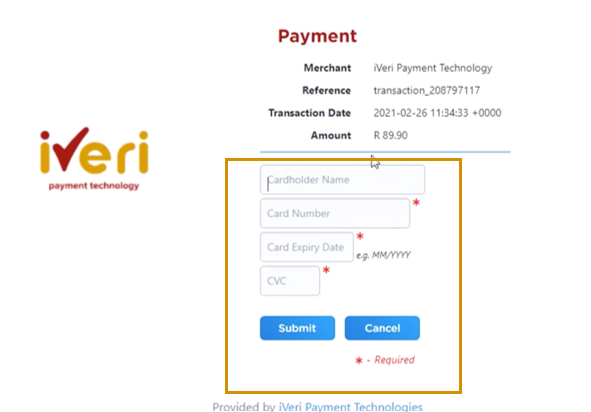
In this example 3DS is enabled for this merchant.
Transaction is processed for 3D Secure.
Cardholder would insert the Secure Password sent to them.
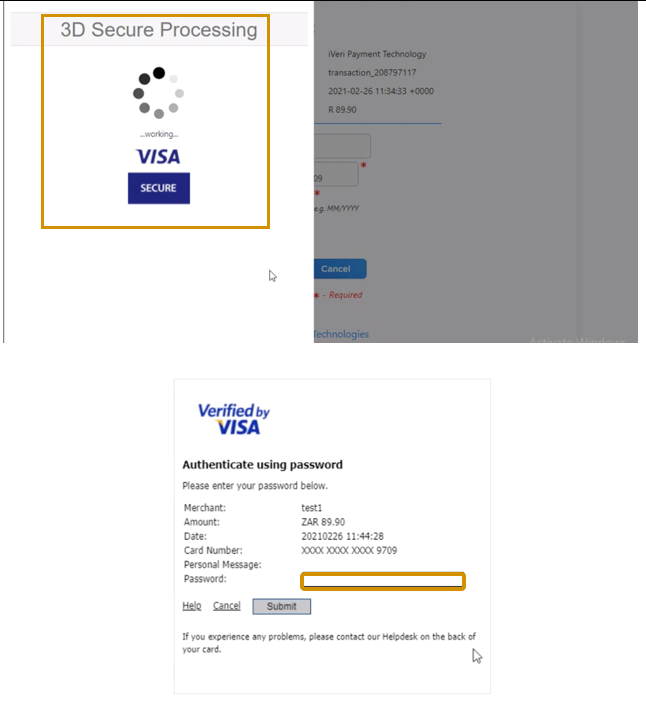
Please Note!
iVeri will always use 3DS to authenticate transactions done for the IYS product.
Wait a few seconds to allow for the response.
This response indicates the payment result is in order.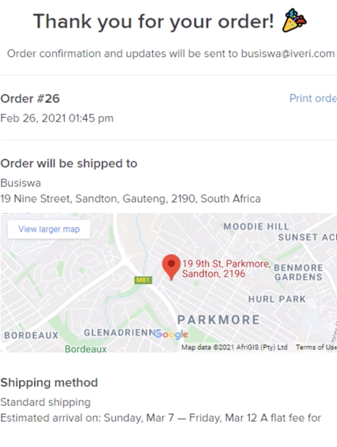
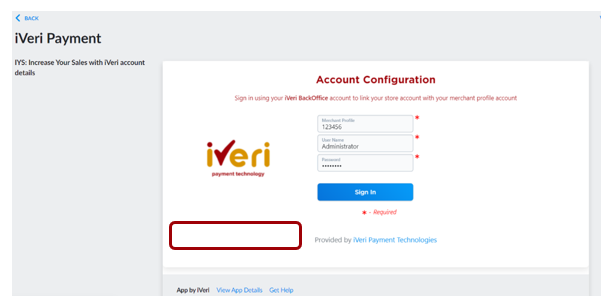
iVeri Payment Application – Configuring iVeri as your payment method option
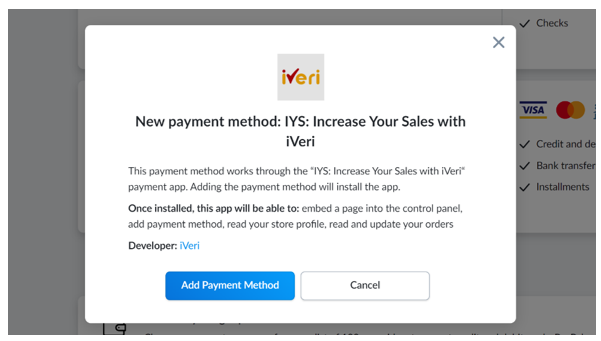
In order to list iVeri as your payment method option, merchants would need to select this from the Apps menu, the iVeri payments application, in order to receive card payments.
Below are the steps to setup iVeri as your payment method option:
The Merchant is able to access the iVeri payment application by navigating:
From the menu, under Configuration > select Payment

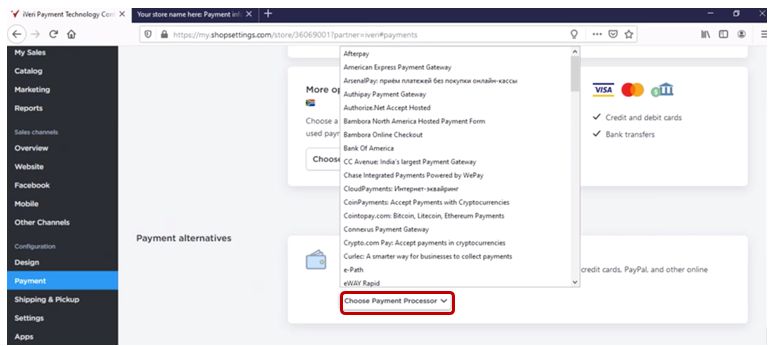
Scroll down to ‘Payment alternatives’ menu.
Here the user Would need to select iVeri as their payment provider.
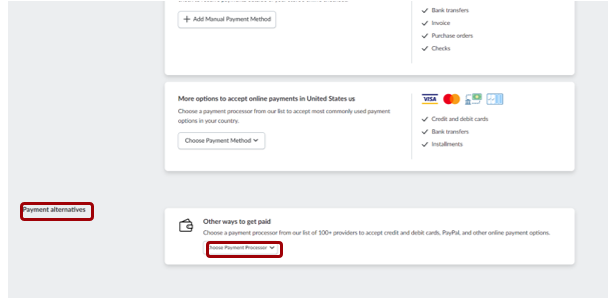
Click on the ‘Choose payment processor’ dropdown.
Scroll down to locate IYS as your payment provider:
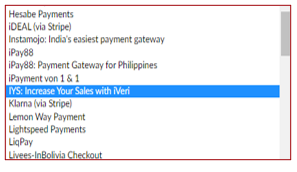
The Merchant is able to access the iVeri payment application by navigating:
From the menu, under Configuration > select Payment
Insert your iVeri provided store credentials.
These are the merchants BackOffice account details that would have already been received via e-mail notification.
Click ‘Sign In’ once you have completed your login credentials.
This will complete the process of adding iVeri as a payment method.